Create Entra Azure AD custom roles with PowerShell
Are you looking for a way to create Entra Azure AD custom roles with PowerShell? Read on to learn how.
How it works
For it to work we are going to leverage Microsoft Graph + PowerShell + Invoke-Webrequest.
- First we manually need to create a custom role, go to Azure AD>Roles and administrators>New custom role
(Make sure you are a Global Admin or Privileged Role Admin to perform this action)

2. Give a name and description and choose “Start from scratch”
3. Choose the Permission paths
If you are looking for some inspriation, consider my GitHub repo: thenikk/aadroledefinition: A dynamic repo with Entra Azure AD roles and permissions. (github.com)
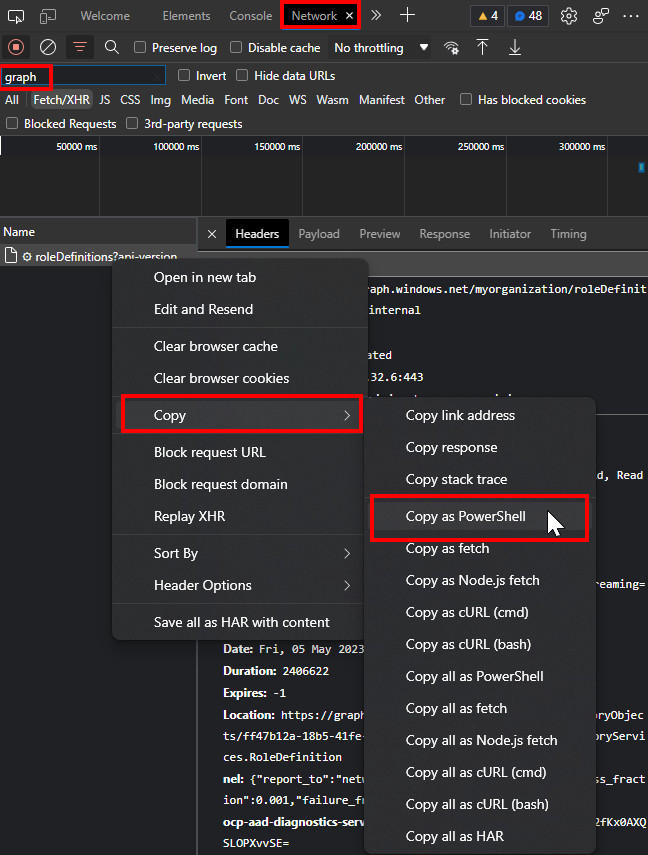
4. Enable the Developer tools (F12) and go to the Network tab and search for “graph” — now create the role
5. You should see one entry, right-click on it, Copy>Copy as PowerShell
The code will look like:
$session = New-Object Microsoft.PowerShell.Commands.WebRequestSession
$session.UserAgent = "Mozilla/5.0 (Windows NT 10.0; Win64; x64) AppleWebKit/537.36 (KHTML, like Gecko) Chrome/112.0.0.0 Safari/537.36 Edg/112.0.1722.64"
Invoke-WebRequest -UseBasicParsing -Uri "https://graph.windows.net/myorganization/roleDefinitions?api-version=1.61-internal" `
-Method "POST" `
-WebSession $session `
-Headers @{
"x-ms-client-session-id"="XYZ"
  "x-ms-command-name"="RoleManagement%20-%20CreateCustomRole"
  "Accept-Language"="en"
  "Authorization"="Bearer XYZ"
  "x-ms-effective-locale"="en.de-ch"
  "Accept"="*/*"
  "Referer"=""
  "x-ms-client-request-id"="XYZ"
} `
-ContentType "application/json" `
-Body "{`"displayName`":`"MyCustomRole`",`"description`":null,`"isEnabled`":true,`"isBuiltIn`":null,`"resourceScopes`":[`"/`"],`"rolePermissions`":[{`"resourceActions`":{`"allowedResourceActions`":[`"microsoft.directory/deviceLocalCredentials/password/read`"]},`"condition`":null}],`"objectId`":null,`"templateId`":null}"
Hint: you can edit the body with custom payload. Even permission paths that are not supported in the UI work.
6. Now run the PowerShell, note that the authentication is achieved through the Bearer token, this has a limited lifetime of ~60min
If you are looking for more context regarding Microsoft Graph, read my blog post: Get started with Graph API + Explorer and Powershell — how to import/export Intune profiles (oceanleaf.ch)